Santa Cookies with my New Favorite Cutter
This post may contain affiliate links.
I have a lot of cookie cutters. Ha! That is probably the understatement of the year! I look for them everywhere I go and I usually find a new one or two, or ten to buy. This year, the cutest Santa and reindeer cutter was delivered to my door. Well, kind of delivered to my door.
I received a Fancy Flours catalog and found a Santa cutter that I had to have! I had to make into Santa cookies right away. What do you think? I love this cutter and it has quickly become my new favorite Santa cutter. Well second favorite after this guy.
 I love the hat because it is not a traditional hat that hangs to the side and the beard is longer than most cutters. I love it! I didn’t want to use beads for the eyes so I decided to paint them with food color gel and I am glad I did. I think it gave Old St. Nick a little character.
Supplies for Santa Cookies:
15 Second Icing in the following colors:
- White
- Red
- Flesh
- Flesh with a touch red icing for the nose
- If you need an icing recipe, click here and here.
- If you need a roll out cookie recipe, click here and here.
#2 Piping tips
Liner Paintbrush
Brown Food Gel Paste
White Food Gel Paste
Santa and Reindeer Cookie Cutter
Optional:
- Airbrush Gun
- White Sprinkles
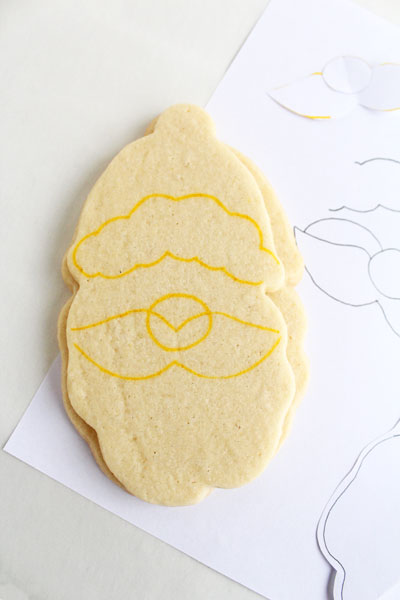
How do you make patterns for your cookies? I thought I would share with you how I make mine. I can’t draw very well but, I can use scissors. Let me show you how I do it.
 I begin by tracing the cookie cutter onto a piece of paper. Then, I cut it out and start drawing one thing at a time such as the mustache or the fir on the hat. If I break it down and do one thing at a time it is easier because the outline of the cookie cutter helps me know where the fir should start and where it would end.
 Since all cookies don’t bake the same, I cut out several patterns so I can trim them to fit each cookie. These cookies were made from the same batch of dough, both baked on the Silpat, and both rolled out to the same thickness. So why is the bottom cookie so much larger than the top cookies? Because the more you re-roll the dough, the more it spreads when it is baked.
 If you don’t have a copy machine don’t worry. All you have to do is tape your pattern onto the window and then tape a plan piece of paper on top of it.
 The light from outside will allow you to see the pattern so you can trace the image as many times as you need. Like I said before, a copy machine would be easier but, I seem to be out of ink most of the time. This has saved me many times.
 Cut out the pattern pieces and trace them onto each cookie with a food safe marker.

- Outline and flood the face with the flesh colored icing. For information on how to outline and flood a cookie, click here and here.
- Flood and outline the beard with the white icing.
- Outline and flood the hat with the red icing.
- Let this dry overnight so you reduce the chance of the icing colors bleeding together.
If you want, you can airbrush the face and the hat with warm brown airbrush color. I like the look of the airbrushed cookies but, the ones that are not airbrushed are cute also.
 Next, outline and flood the fir on the hat and the ball on the hat. If you want to add sprinkles, do it while the icing is wet. Then, outline and flood the mustache. Let it dry for about 30 minutes.
 To paint the eyes, use a liner paintbrush and white food gel paste and paint a teardrop shape. Let it dry for a little while and then, paint a smaller brown teardrop on top of the white. Add a white dot for the sparkle in each eye.
Flood the nose with the flesh colored icing. If you want his nose to look pink, add a little red icing to the pink. It will make his nose look cold.
 There are so many ways to decorate these Santa cookies. I have plans for them and the reindeer later this holiday season. If you decide to make him, I would love to see your pictures so please email me or tag me on Facebook!
In the meantime, here are some more Christmas cookies for you to enjoy.
- The Santa that Started it All
- Snowflake Cookies
- I want a hippopotamus for Christmas
- Penguin Cookies
- Reindeer Cookies– It is the reindeer cutter that was in this Santa set.
- Individual Santa Cakes with this Santa Cookie Cutter
- Beginners Guide to Cookie Decorating
Bear hugs,

Exceptional work! LOVE!
Thanks Asmita!
So adorable, Lisa! Your work always brings such a smile to my face!
“YOU” always bring a smile to my face Tracy!
He is so adorable…I neeeeed him…*runs off to see if Fancy Flours deliver to Italy* I just read your story story about your original Santa cookie cutter…that could so be , not sure my husband would hug me though, you are very lucky!
Hi Jo! Do a google search for “Jingle All the Way Cookie Cutters” because there are a lot of places overseas that sell them. You might get lucky. I also added 3 more places to buy them in the supply list.
Merry Christmas!
Thank you so much Lisa! You are right, there are a lot of places that sell them and I found them on Amazon for only £3.50!! Thanks again and Merry Christmas to you too!
Merry Christmas to you Jo! Glad you found the cutters!!
So cute. Thanks for the tutorial.
Thank you Kathy!!
Lisa, I love this Santa face, and this is the cutest post – the note to Santa made me smile 🙂
Thanks TriciaZ! I hope I get a puppy for Christmas. I have been a good girl! LOL
P.S. Just purchased the cutter set on Amazon. Couldn’t resist. Thanks again.
Awesome Kathy! Can’t wait to see what you do with it!
Hi Lisa,
Those are fantastic! I, too, saw this on the fancy flours catalog and waited. It’s now out of stock for the season! So, I ordered it from amazon- only to find out my husband had already bought it for me for Christmas… Only bad thing, I suppose, is that I have to wait until next season to use it. I shall pin this to remember!
Awe! Your hubby is sweet! He bought you a cool cookie cutter! Merry Christmas!
Adorable, of course! Also, love the window trick. I often make mini patterns just like you but had never thought to use the window like a light box. I’m also embarrassed to have not thought of that sooner. Thanks for the great trick, Lisa!
I have been doing the window trick for years! It has helped me a bunch. I am happy to pass it along to you!
Super cute! Just a perfect Santa! That is a great cutter too!
Thanks Glory!
I had to have these and Fancy flours was sold out but YAY I found them on Amazon.com…there are a few sets left for anyone who is interested. Thanks for the tutorial…can’t wait to get the set and use it!
Thanks Kathy! I added a few links to the supply list where I found other places to buy them. Glad you found them.
Great post!!!
PS-I love your letter to Santa!!
Thanks Tesei! I do want a lab puppy for Christmas. Maybe Santa will bring me one 😉
Very cute. Your design is wonderful. I love the expressive eyes.
Thanks Beth!
Another beautiful cookie. Someday I hope to be HALF as good as you with cookie decorating!
Thanks Sarah. I have seen your cupcakes and you are an amazing decorator!
You’re too kind. Thank you! 🙂
So cute Lisa!! I love him! Especially his bushy eyebrows!
Ha! I only gave one Santa bushy eyebrows! I am not really sure why I didn’t do the rest! LOL
I love the nose that you gave Santa…perfect and painting the eyes was a great choice. Great tutorial too on how you decorated these.
Thanks so mcuh Paula. It is a great cutter 😉
Oh Lisa, you’ve done it again, made the cutest little cookie – now I want that cutter too. Better yet, I want you to come to my house and bring the cutter and bake with me! 🙂
I would LOVE to get together with you Kim! I don’t think we would get any decorating done. We would be busy talking and laughing. 😉
Oh my gosh he is SO cute, I could just eat him up, LOL!
Thanks Diane! I did eat one up and he was good! LOL
Such a lovely Santa!! I like a lot this cookie cutter too 🙂
Thanks! I think it might end up being my favorite cookie cutter before the season is over! LOL
Great Santas, Lisa! Love that cutter. Also, I had no idea that re-rolling the dough causes spreading. That totally makes sense now that you pointed it out! As always, thanks for the great tips!
When I started baking cookies, I once re-rolled dough about 6 times and the surface look like Yoda’s face! LOL It was very wrinkled and the cookies were a 1/2″ wider than the cutter.
Last year, when I saw your Santa post, I immediately rushed over to Ebay to find that adorable cutter. It became one of my new favorites! This year when the Fancy Flours catalog arrived I thought this set was adorable but I told myself that I did not need another Santa or reindeer cutter. However, after viewing your wonderful, I may reconsider shopping. I hope you get a percentage of their sales because I am sure your amazing designs will make people rush to buy this cutter set 🙂
Sorry for making you buy another set of cutters Diane! LOL I can’t wait to see what you do with it!
Fancy Flours should be giving you commission! That’s a FABULOUS cutter set. Somehow, my eyes missed it in my catalogue. Thanks, Lisa! Your Santa is just gorgeous!
I wish Gail! LOL You always make me laugh.
So stinkin’ cute…but I have come to expect nothing less! I love this Santa’s face…adorable~
Thanks Terri!
These are SO wonderful, my goodness!! Question, on the eyes, rather than using white food gel paste, do youthink that white icing will work? using a paint brush of course 🙂 THANK you SOOO much for sharing and teaching!
Hi Jenn,
You can use white icing and add a 4mm edible candy pearl or a black dot of icing. If you paint with icing, it will be very dull so I suggest piping it on. Hope this helps. 😉
Thank you Lisa, I think I will try to paint the eyes using the gel, yours are so nice I have to give it a try. Can you by chance tell me what Liner brush # you used? So excited to make these with my daughter 🙂 Thank you!
SOLD! Cutters are on the way!
GOOD! We all need this set!
His eyes are so expressive and he has so much dimension! I just love him! Sheesh, Lisa…Each new cookie becomes
my favorite:)
Awe, thanks Sue!
I JUST bought this set over the weekend! I found them at a cookie shop and, of course, I had to own them. 😉 Such a different shape…and isn’t the reindeer the greatest?! Can’t wait to try him (or her) out too! Looking forward to seeing yours!
I never see cute cutters like these at cookie shops! What is the name of the shop and do they have a website? Please say yes! LOL
It’s called Downtown Dough in Cedarburg, WI. Always a must stop when I’m in the area! I believe they DO have a website, but you know, I just like to look at cookie cutters in person better. 🙂 Happy shopping!
Adorable! I love their noses 🙂
Thanks Jennifer!
Lisa, your work is amazing. I love this Santa, and i’m sure FancyFlours loves you, cuz they are out of stock!! 🙂 I love the simplicity of this one, and that it’s a little different from all the rest!
Fancy Flours is sold out of this cutter set! Can’t decide if I’m relieved or disappointed 😉
Karla
I can’t wait to try these! We did your turkey/nugget cookies and they were a HUGE hit with the family. Thank you for sharing such wonderful ideas with us!!
Happy Holidays!
Sam 😀
these are just precious! Thanks so much for sharing your ideas and techniques. I’m new to cookie decorating so I really appreciate your step-by-step instructions. I bought the book “Cookie Decorating” by Bridget Edwards. She recommends putting the cut out cookies in the freezer for 5-10 minutes then straight into the oven for baking. I’ve found that keeps the cookies from losing their shapes and size. Thanks again!
You are brilliant. Thank you so much. But we cant see your videos, becase of youtube restrictions. Would have be a solution?
Which video do you want to see? I will send you a link. 😉
Hi Lisa,
would you please send me this videos links: spooky rose cookies, How to a pretty Daffodils, how to made a simple primorose, how to made pansies, daisy and how to paint a cookie.
Sure! Enjoy!
Spooky Rose Cookies:https://www.youtube.com/watch?v=35sfAozgDww
Daffodils: https://www.youtube.com/watch?v=wVq2bvaxTrs
Simple Primroses:https://www.youtube.com/watch?v=qKGqFLrKTCk
Pansies:https://www.youtube.com/watch?v=kQYetw_0_IU
Daisy: https://www.youtube.com/watch?v=B53va05c_vw
How to Paint a Cookie: https://www.youtube.com/watch?v=PGlx-smFoy0
How to Make an Apple Blossom: https://www.youtube.com/watch?v=07ZW6ATohWc
Here is the link to my Youtube Channel where you can find all of my videos: https://www.youtube.com/user/thebearfootbaker/videos
Hey. I love this cutter and got it a couple of weeks ago. I didn’t make a Santa with it, but I did make a bearded man with a beanie. It looked awesome.
I would love to see it Elizabeth! Can you email me a picture to lisa@thebearfootbaker.com?
If you can’t find that santa you can flip an ice cream cone cookie cutter, round off the cone part to a hat the icecream part of cone is face and beard and there is your santa. Have fun
Where did you get your new favorite Santa cookie cutter. i have looked everywhere
Hi Marilyn,
I sent you an email about this cutter. Unfortunately they’ve discontinued making them. This post was made back in 2013 and I really wish they would make it again. Sad.
Hi Marilyn,
I sent you an email about this cutter. Unfortunately, they’ve discontinued making them. This post was made back in 2013 and I really wish they would make it again. Sad.
i want to receive notice of your videos, posts and recipes