How to Make Fun Frankenstein Cookies with Royal Icing
This post may contain affiliate links.
I have an announcement! I’m sharing this tutorial on How to Make Fun Frankenstein Cookies with Royal Icing and I’m opening my Bearfoot Baker Cookie-Cutter Shop today! I’m so excited I don’t know what to say. I’ve been working on cutters for you for quite some time and I’ll be adding more of them to the shop almost every day! Be sure to stop and see what’s new and if you want me to make something you want please let me know! Did I mention how excited I am?
The best part is I’ll be making tutorials to encourage you and show you how to decorate. You can follow what I do or create your own version. Do you ever look at a tutorial and then spend hours looking for the cutter? I know I have and that won’t happen here because I’ll be making the cutters for us. Over the years many shops have opened and closed or discontinued some of their designs. That won’t happen here. If you need a cutter you’ll be able to find them and that makes me super excited!

I’ll be working morning, noon, and night until I get the cutters in the shop so please be patient with me. I’m so excited to share them with you and I thought this fun Frankenstein would be a great way to launch. There are a few more cutters available right now and I’ll be adding more as quickly as I can. I can’t wait to show you what I’ve been doing. Right now, let’s get started with Frank! He’s not the only cutter in the shop and I’ll be adding more today.
Supply List:
(may contain affiliate links)
Recipes:
Cookie Cutter:
Royal Icing Colors:
You will need an outline and flood-consistency royal icing for this cookie. If you don’t want to make two different consistencies you can use a 15-Second Royal Icing I personally do both depending on my mood. Sometimes using two consistencies is easier for me because that is how I learned and what I’m comfortable using. Do whatever makes you happy!
- White- Americolor Bright White
- Black- Americolor Super Black
- Green- The Cookie Countess Glowing Green with a touch of Forest Green
Airbrush System:
Airbrush Colors:
Tools:
- The Cookie Countess food-safe marker
- Turkey Lacer and or a Scribe tool
- Paintbrush– This isn’t the brush I used, but I like how it looks. If you have a food-safe brush you can use the one you have.
- Black Food Gel Paint and a food-safe paintbrush
- Piping Bags
- Optional- #1.5 PME Piping Tip- I like using piping tips but most people don’t. Do whatever makes you comfortable.
How to Make Fun Frankenstein Cookies for Halloween Video:
Enjoy the video!
Let’s Make Frankenstein Cookies:

- Begin by drawing the face on your Fun Frankenstein cookie. It’s not hard if you take it one line at a time. Feel free to watch the video to see it in action. Just take a deep breath and draw Frankie! You’ve got this!
- Next, use the food-safe marker to draw the hair, and mouth, and to add the black around the eyes. We aren’t going to add any royal icing to the eye area. We’re only going to use the food-safe marker. The marker will make it look as if the eyes are standing out. It’s a really cool way to give your cookie some dimension. If you’re looking for a good marker I like The Cookie Countess food-safe marker. It covered the cookie well and didn’t bleed into the white or green icing around the area I colored.
- Now it’s time to add the green outline on the edges of Frankensteins’ face and on the lines you drew.

- Flood the face with the green flood-consistency royal icing.
- Place the cookies in front of a fan to dry the surface before you start to airbrush them. These were dried for about 45 minutes. I wanted to make sure the top layer of the icing formed a crust before I started. If you want you can let the icing dry completely before you airbrush. Just make sure the surface is dry enough so the air from the airbrush won’t damage the icing. If it’s not dry enough the air will crack the icing and it will look a little creepy. I guess that would be okay on a Halloween cookie, but I don’t think Fun Frankenstein would look fun. He would look a little cracked up!! lol
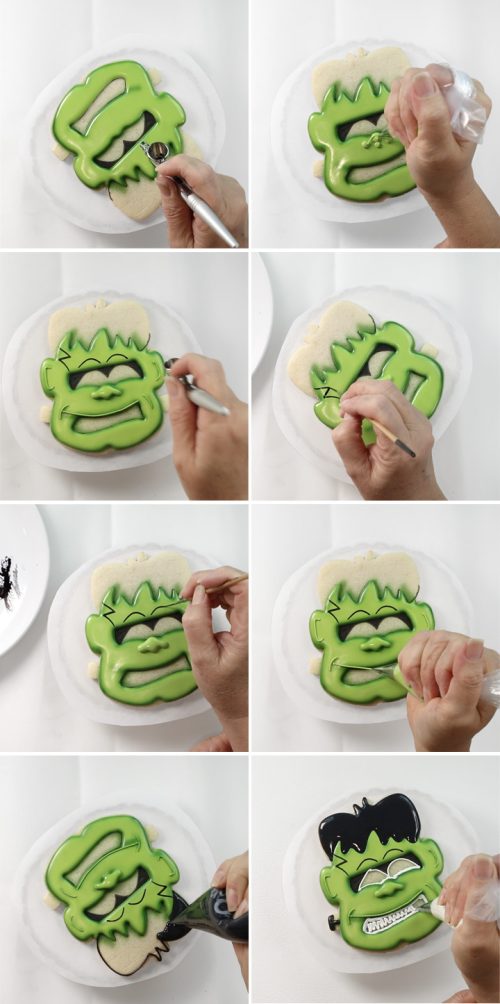
- Airbrush around the face, eye area, mouth, and the hairline.
- Pipe the nose with the outline consistency of green royal icing. You can make four dots and connect them.
- Then, pipe over it with the green flood consistency. Be careful and don’t overflood. Just add some to the top and use the turkey lacer or scribe tool to smooth it out.
Time to paint:
- Mix a little black food-gel color with a tiny amount of water and paint the lightning bolt on his forehead and eyebrows above the eyes.
Outline and airbrush:
- Pipe green lines on the ears and around the mouth area.
- Airbrush the lines you just piped.
Here is another reason I like to use outline and flood consistency royal icing. You can use the outline consistency to outline the eyes and mouth and then pipe some in those areas. Then you can use the flood consistency to fill them. The outline consistency will help the icing maintain its fullness and help prevent sinking as the icing dries.
- Outline and flood the hair with the black royal icing.
- I don’t have a photo of it but you can outline and flood the bolts with the black icing on the side of his head. Just follow the edge of the bolt and then add the flood consistency.
You’re almost done!

- Fill the eye and mouth area with the white flood-consistency royal icing.
- While the eye icing is wet add a black dot to each eye.
- Let the cookie dry in front of a fan for a while.
Last but not least:
- Paint the lines with some black food-gel color mixed with a little water for the teeth. A detail brush is highly recommended for the best results.
Isn’t he cute?
How cool is this Fun Frankenstein cookie? I had a blast making him and I’ll be back with more cookie tutorials soon. Oh, by the way, if you want to make the moon cookie here is the How to Make Adorable Bat Royal Icing Transfers tutorial with FREE Printables. It’ll show you how to make clouds and airbrush the moon. Stars are being airbrushed in the tutorial, but you can airbrush circles for the moon instead.
Be sure to check back soon because I’ll be adding cookie cutters to the shop. I hope you’re ready for Thanksgiving and Christmas. I’m super excited and so thankful for your support!
PS- I’ve added the links for the cookie cutters for the How to Make a Simple Ghost Cookie with Sparkling Eyes and How to Make a Cute Skull Cookie with Fun Eyes in their tutorials if you want to check them out. Love you all and sending you big bear hugs!!!
Bear hugs,
