DIY Airbrush Cleaning Pot

Do you own an airbrush gun? If so, where do you clean it? When I airbrush I stand by the sink so I can easily rinse out the gun in between each color. The other day I was watching The Cookie Countess on Periscope and she had an airbrush cleaning pot. A what? An airbrush cleaning pot so she could rinse out her airbrush gun no matter where she was when she was using the gun. WOW! I decided I wanted one so I could sit at the table and airbrush instead of being chained to the sink.
When I looked them up online I noticed they are about $15 to $30. Not bad, but being the DIY kinda person I am I decided to make my own airbrush cleaning pot with things I have around the house. I surprised myself with how quickly I made it and how simple it is to make. I knew I had to share this with you immediately.

Keep in mind, I am not trying to talk you out of buying your own professional airbrush cleaning pot, I am just trying to save you a little money by showing you how simple it is to make your own with things you probably have around the house. I have been using mine for about a week now and it is a game-changer. I can airbrush cookies while filming videos for you without running to the sink every few minutes.
Supplies for DIY Airbrush Cleaning Pot:
(may contain affiliate links)
Mason Jar
Mason Jar Lid
Needle Nose Pliers
Hole Punch
Fingernail File
Paper Towel
Sharpie
DIY Airbrush Cleaning Pot Video:
Here is a video to show you how to make the Mason Jar lid and how to use the Parmesan Cheese lid.
Enjoy the video!
DIY Cleaning Pot:

- Are you ready? This is so simple it will be over before you know it so hold on tight and let’s do this!

- Hole punch one hole on the Mason Jar lid making sure to push the hole to the backside of the lid so the top will be nice and smooth when we are done. It might not pop out the little ‘chad’ but that is alright because I will show you how to knock it off in a minute.

- See, no matter how hard I squeezed my little 69¢ hole punch from the Dollar General could not pop out the hole. No big deal. I am smarter than a Mason Jar lid! At least I hope so.

- Move to the opposite side of the lid and punch three more holes. These holes are going to act as the filter when we place the lid on the jar.

- Remember those hateful little holes that wouldn’t pop out? Ha! We are going to make them pop out with our needle-nose pliers. Just place the tip of the plier on the punched hole and push. It will easily push through.

- Flip the lid over and use the pliers to remove those pesky little ‘chads.’

- Remember when I told you to make sure the hole was punched toward the backside of the lid? That is because the lid will be jagged where the holes were punched.
- Take your pliers and stick the nose into the holes and twist to make each hole smooth. Do this from the top side of the lid.

- Repeat with a Sharpie. I did this because if I pulled the end of the Sharpie out and it was cut in anyway, I used the pliers again to make sure the holes were smooth. I thought it would be better to damage a Sharpie instead of my fingers.

- The back of the lid will never be completely smooth again but I used a fingernail file to help smooth off the rough edges. Be careful you don’t cut your fingers when pushing the fingernail file over the sharp metal and when washing it. I don’t want you to damage your decorating hand!

- I debated on covering the lid with a thin piece of cloth or a paper towel. A paper towel is my favorite filter, but if the moisture makes the paper towel wet to the point it needs to be replaced more than once during an airbrush session, I will switch it for a thin piece of cloth.

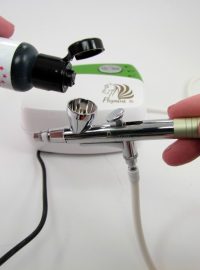
- Attach the lid to start airbrushing.

- See, I made an airbrush cleaning pot and I didn’t have to buy one single thing. You’ve gotta love that.

- When you are ready to wash out your gun, stick it in the lid and pull the trigger. Add a little water and rinse it out until the gun runs cleanly with no airbrush color coming through. I love this new “free” tool and I didn’t have to buy a thing to make it. And I don’t have to worry about storing something that is just used on cookies. Just wash the jar and place the lid in my airbrush gun box. No storing is necessary.

- If you don’t feel like punching holes in lids don’t worry, I have another way to make this bad boy. I must tell you that the lid on the Parmesan Cheese can doesn’t fit as well as I would like so I prefer the Mason Jar lid. But if you don’t pick it up by the cute little green lid I think this one will work for you. It is snug but I want something tighter because I spill things and drop things. But if you are careful, this will work for you.
Enjoy your airbrush cleaning pot! I know I am enjoying mine and you will see it in my videos from time to time!
More on Airbrushing Cookies:
Airbrush Gun Replacement for $25
Airbrush Spots! HELP!
How to Hold an Airbrush Gun
How to Stencil Cookies with an Airbrush Gun
Bear hugs,


Great idea! I once attended an airbrush class at my local bakery, and they had us use a to go plastic cup with a lid, fill it with paper towel and put your air gun in the straw hole to clean. Disposable and easy. I like your permanent idea and the fact it’s sturdy and reusable. Thanks Lisa for your post!!!!
What a great idea! I like the Mason Jar because it doesn’t tip over. Nice and solid so less mess. You know what a messy decorator I am! LOL
I am new to air brushing and I have a couple of questions. Why do u need so many holes and why do u need a filter?
Great idea! Thanks for sharing! I’ll give it a try!
I hope you like it! 😉
Great idea! I have been watching your other videos on cleaning the gun. I had major issues – only spattering. I have only used my gun twice and cleaned it really well. I took it apart and soaked it last night. Was there possibly something else I was doing wrong? ;( Thanks!
Sometimes the guns aren’t put together properly before they are shipped. Sad isn’t it!
Here is a video from Mike with Karen’s Cookies. It is at the end of the post. I suggest you watch it all the way through. He will show you exactly what to do to fix the spattering:
http://thebearfootbaker.com/2015/10/airbrush-gun-replacement/
Let me know if it is sill messing up after you fix it “Mike’s Way.” 😉
Thanks Lisa! Not sure how I missed that video! I discovered it’s a “quick release” connection that isn’t working properly, therefore letting air escape. I contacted Karen’s Cookies to see where I can get a replacement. Thank you for your help and for always answering our questions!
If you click the red links in my post here you can order one for less than $25. Here are the links for you. 🙂
http://amzn.to/20LqsNk
or herehttp://amzn.to/20Lquob
I’ve got to try this! I’m waiting on my new airbrush to arrive as my old one went kerplunk! I missed Hillary’s periscope on this so I’m going to have to look for it on her website or that other video media site that has all her periscopes stored for late viewers, lol…I can’t for the life of me remember what it’s called..not youtube though 😉 Thank’s for this tutorial Lisa 🙂
I love….”remember those hateful little holes that wouldn’t pop out?” and “I thought it would be better to damage a Sharpie than my fingers.” You are too funny, Lisa. I love your wit and humor, and that you include it in your directions. I feel like you are sitting across from me when I read your posts. Don’t ever change!
Would a coffee filter under the lid work as well as a paper towel? I have hundreds of them lying around since switching to a k-cup machine to get my caffeine fix.
Thanks for sharing your money saving idea with the rest of us!
I am glad you feel like you are here with me! I feel like you are here in my kitchen having coffee with me!!!
I think coffee filters are a great idea. If you try it let us know how it works and what a great use for all of those filters. I mean really, how many coffee fliter wreaths can we make! LOL
Love this. Though I am currently struggling to clean my airbrush after using Dinkydoodles Liquid Shiny – it seems to leave a residue behind even after thorough cleaning and I have had to take my airbrush apart completely to try and resolve it…. any advice?!?
Hey Jules!
I bought some Dinkydoodles from The Cookie Countess the other day and used them right away. I was a little worried when I looked in the cup of the airbrush gun because the color dried right away. I stopped and put the color back into the bottle and washed the gun with water, then vodka and finally I took a Qtip with vodka and cleaned the entire airbrush (in the cup and around the needle) and it worked fine. I wasn’t having a problem before I washed it, I just freaked out a little when I saw Wendy (my airbrush has a name) with color on her that didn’t seem to come off easily.
Now let’s try to fix your issue. I have some questions for you so I can help figure it out.
1. Is your gun working or is it spitting colors?
2. I have not tried the Pearl colors yet. Is ‘Liquid Shiny” the name of the color or is it a pearl color?
3. Did you wash it with vodka?
4. Have you seen this video: http://thebearfootbaker.com/2015/10/airbrush-gun-replacement/ on how to take the gun apart and clean it and then put it back together?
If you answer these questions for me I will know a little more and maybe we can fix it together. 😉
Don’t stress! I bet this will be a pretty simple fix.
Lisa
Hi. Thanks for your reply!
Liquid shiny is their product with is a clear protection layer and then if you do repeat sprays you can get a great gloss effect. I used it fine the first time. Cleaned my airbrush as normal by running water through (as instructed by dinkydoodle). It’s clear so hard to know when it’s clean with liquid shiny. Came to use my airbrush the next day and the needle wouldn’t move (so obviously did a very bad job of cleaning it!!). Ran hot water through it and needle moved fine and sprayed fine. Put more liquid shiny in to go again and it was like my airbrush just seized immediately. I left it on hot water for an hour or so and then took it apart completely. Still to put it back together. Will try running the vodka through it. The liquid had left like a cloudy gum type of residue all over the cup and gun through to the needle. Love the product but am not sure I’m prepared to go through this each time I use it!!
Jules
Let me talk to Hillary The Cookie Countess. I haven’t used that product and since she carries the Dinkydoodle line, she might be able to get some answers for us.
I don’t blame you on not going through that process every time either. I like easy peasy. I will say I love the DD colors. I haven’t had any trouble with them but let me see what I can find out about the Liquid Shiny for you.
It looks great! I don’t have an airbrush cleaning pot but it is really interesting to know what kind of things you might be able to create with one. Thanks for sharing!
If you airbrush away from your kitchen sink, you will probably enjoy having one. It saves me a lot of work!