How to Make American Flag Cookies with Video

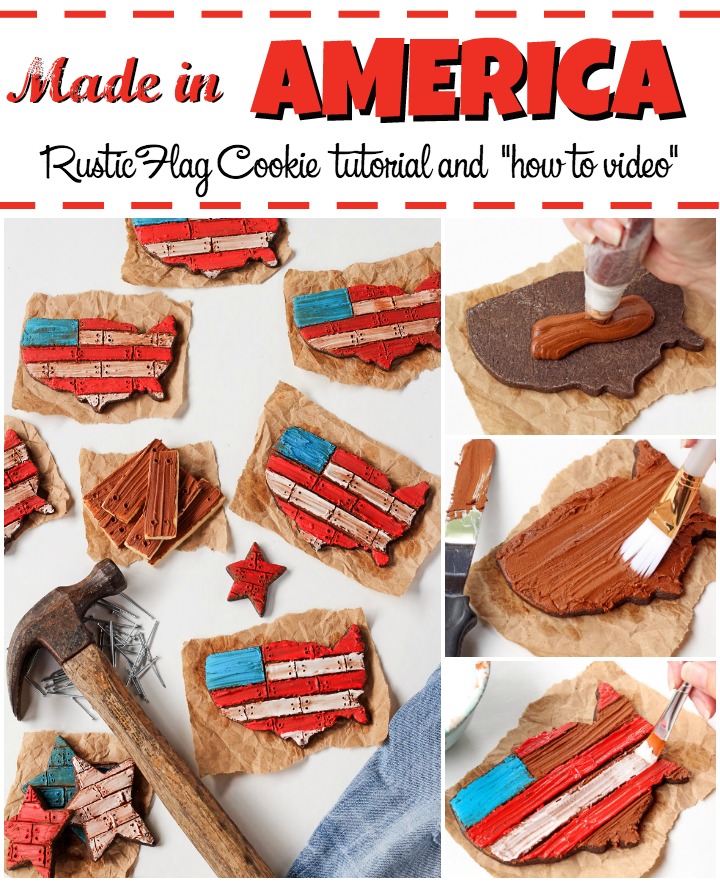
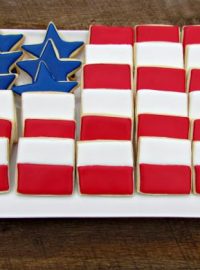
American Flag Cookies have been on my to-do list for a while now. With all of the humidity in my area, I wasn’t sure how to decorate them without all of the colors running together. Then it happened! A lightbulb went off when I saw all of the plank cookies popping up all over the place. So what did I do? I sat and waited patiently so I could make them for Independence Day. The United States of America Cookie Cutter with red, white and blue planks. Perfect for those of us with high humidity issues.

If you don’t live in the US you can make a version of these using the colors of your flag and a cookie cutter in the shape of your country.
Supplies for American Flag Cookies:
(may contain affiliate links)
Recipes:
- Chocolate Roll-Out Cookie Recipe
- Royal Icing Recipe-Make the royal icing thick by adding less water. If you only want to make a few cookies you can try this Half a Batch of Royal Icing Recipe
Cookie Cutters:
- United States of America Cookie Cutter
- Star Cookie Cutters-optional
- Stick Cookies cut with a pizza cutter-optional
Royal Icing Colors:
- Chocolate Brown Americolor Soft Paster Food Gel Color
- Super Red Americolor Soft Paste Gel Food Color
- Sky Blue Americolor Soft Paste Gel Food Color
- White
Tools:
- Turkey Lacer
- Boo Boo Stick
- Paintbrushes
- Offset Spatula
- Bench Scraper
How to Make American Flag Cookies Video
Rustic things make me so happy! Speaking of rustic, if you want to make the stars or planks, repeat the process for the flags.
American Flag Cookies Tutorial:

- Begin by baking a batch of cookies and cutting out some United States of America, star, and plank (board) shapes. The stars and planks are optional, but if you’re making a platter of cookies they are good fillers.
- Make a batch of thick royal icing. You want the icing to be thick enough to hold a shape so when you drag a paintbrush through it there will be lines that make the cookies look like wood.
- Once the cookies have been baked and cooled, add a generous amount of brown royal icing and use an offset spatula to smooth it around the cookie. It doesn’t need to be perfect just a nice somewhat even coat.
- While the brown icing is wet, use a paintbrush to drag across the cookie. You should go in one direction like left to right or right to left so all the ‘wood grain’ will look a bit more realistic.
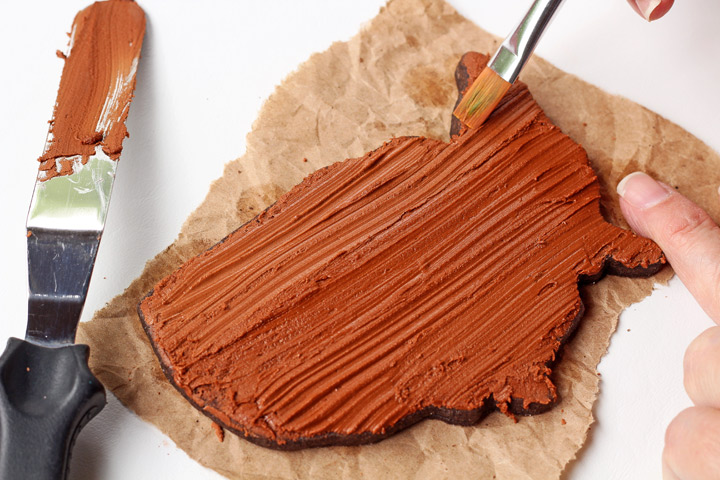
- If you use a bigger brush that doesn’t give your lines enough detail don’t worry. Just grab another brush to make the lines the way you want.
- Remember to work quickly while the icing is wet.

- Use the bench scraper to make the lines. Start with the area your going to paint blue first and then add the other lines.
- Let it dry for about 10 minutes before moving onto the next step.
Add Color to Your American Flag Cookies:

- Once the brown icing has had about 10 minutes to dry, start adding the colored icing.
- Begin with the blue and paint it in the direction of the lines on the ‘wood’ until you have covered the entire area. Try not to paint a very thick coat so you can still see a little of the brown icing for that aged wood look.

- Repeat with the white and red icing.

- While the icing is wet, you can add the lines for the boards or planks. You decide how long you want them and make the marks. Be sure to stagger the lines for the red and whiteboards so it looks like you actually made it with real wood.
- Use a turkey lacer to make lines in the red icing. Line them up from North Dakota all the way down to Texas!
- See how all of the red lines are even and all of the white lines are even? That is the look you’re going for.
- Once you have made the individual boards, use the turkey lacer to make a few holes for the nails. It really is a fast fun detail for these American Flag Cookies.

- One more thing to do before was done and that is to clean the edges of our American Flag Cookies. Use a Cookie Scraper (aka Boo-Boo Stick) to knock the icing off of the edges.
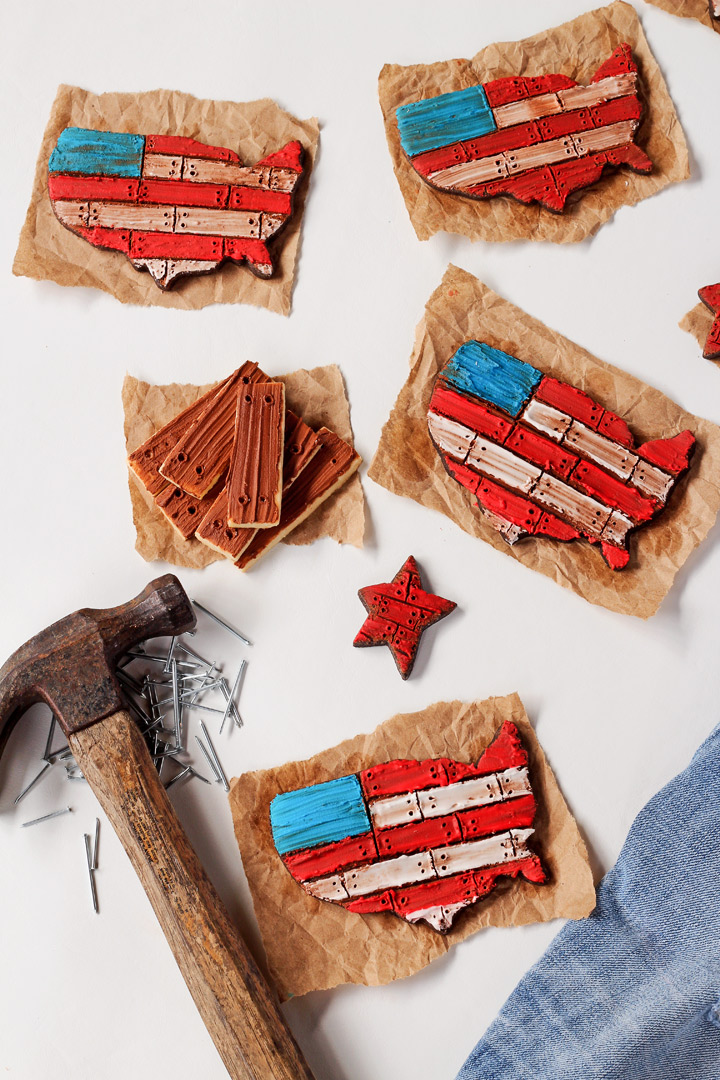
Wouldn’t it have been neat if the hammer and nails were cookies? Maybe next time! But the fact that these cookies are Made in America and will help beat colors bleeding together due to the humidity is enough for me. I will just have to make a hammer and nail cookies another day.
More Patriotic treats for you:
- Patriotic Cookie Pinterest Board
- Sweet Sugar Belle’s Patriotic Pinterest Board
- Glorious Treats 4th of July Treats and Ideas Pinterest Board
Bear hugs,


These cookies “wood” be great for our family reunion coming up on the 4th of July. “Planks” a lot for sharing….you really “nailed” the aged, wood-grain look!
Your puns are perfect! You sure ‘nailed it!’
All I can say is….WOW……absolutely amazing and great idea. One of the techniques that is on my list to do this Summer is wood grain effect, now I can add these to them too. Thank you for a fabulous tutorial……as always ? Claire
I know your going to love it Claire! It is fun to try something besides outlining and flooding. With all the rustic inspiration out there I know your going to make something amazing! 😉
Amazing. You are so talented. Living in a high humidity area this could be something that might work for me. Also thanks for posting early enough to enable us to gather the supplies needed. God Bless America
We could be “High Humidity Sisters” Brenda! LOL I don’t know if thats the best club we can be in but at least we can support each other with cookie designs and solutions. 😉
Love these!!!
Thank Anne!
Love these! Great idea
Thanks Gaby!
I love the cookies, truly a work of art! 🙂
Your a work of art Kim! 😉
Thank you! I needed some inspiration for some cookies I’m making later this month! Perfect!
Have fun making your cookies Debbie. Let me know if you need anything!
Love these and cannot wait to try them. Thank you!
I got my U.S. cutter and can’t wait to get started! Your cookies are amazing! Love the look!
These are awesome!!!
Love these!!! And it’s a fun and stress free cookie to make when your not in the mood for that perfect icing look😁🇺🇸
I’m thrilled!