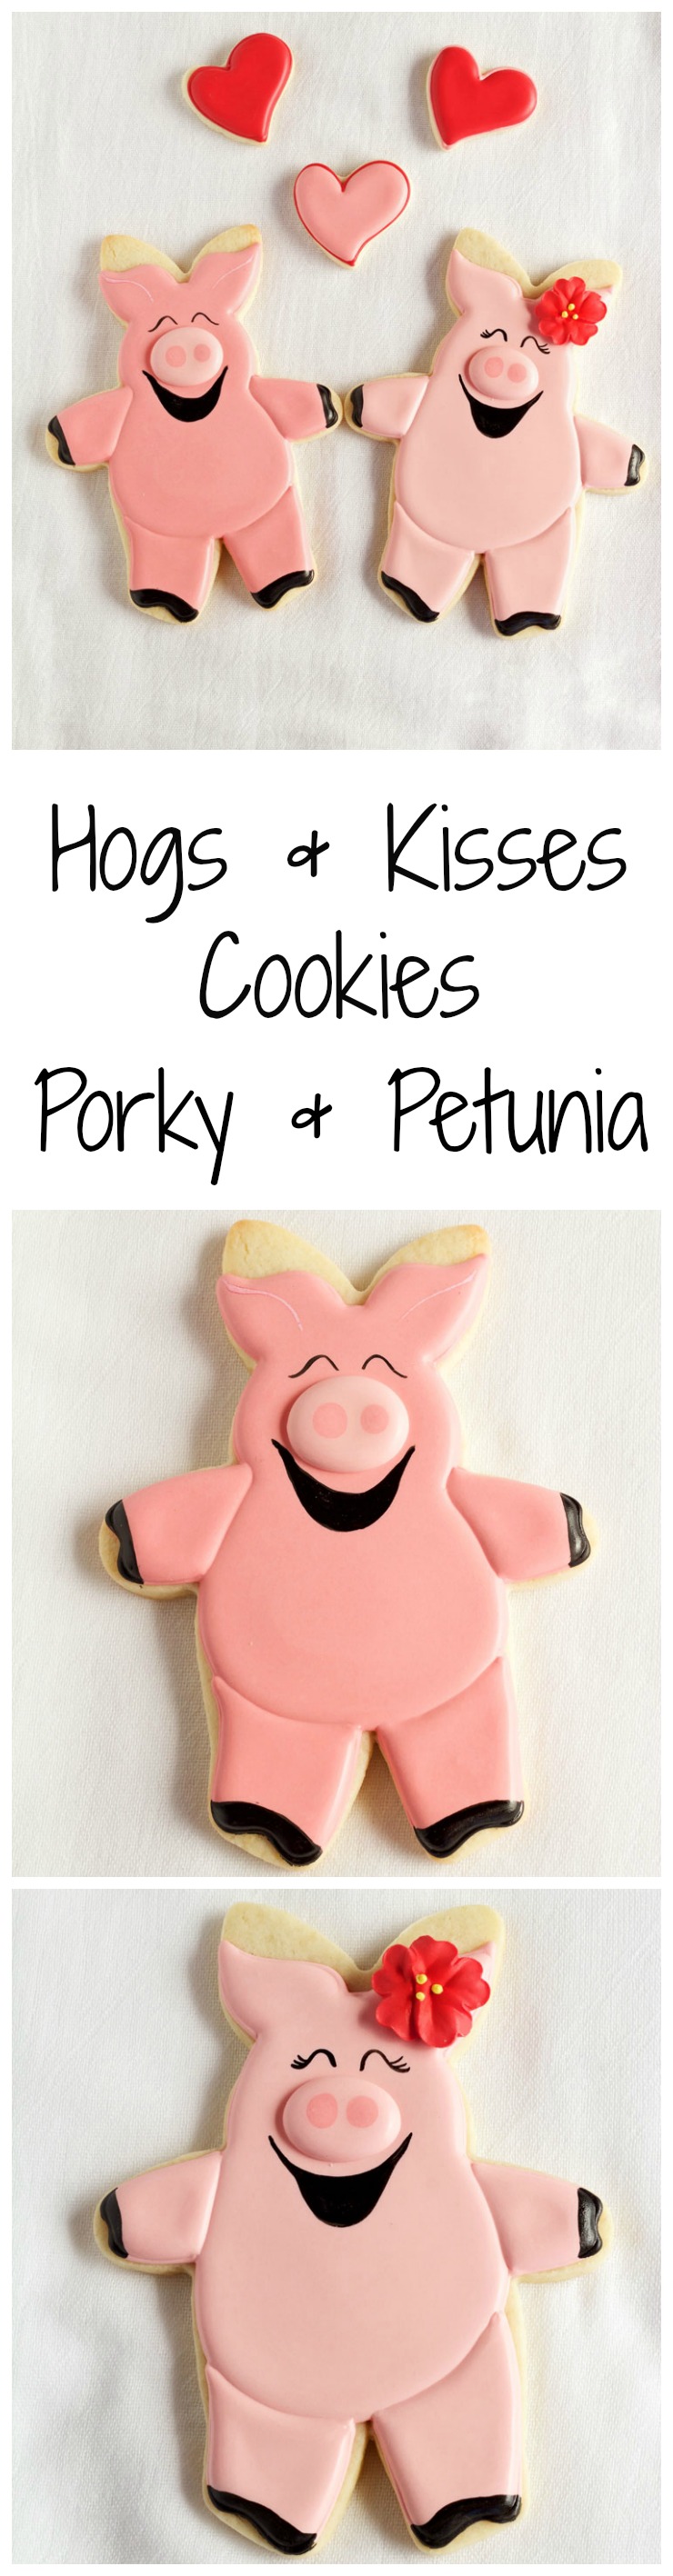
Hogs and Kisses Cookies
Happy Valentine’s Day everyone! I love you all so much that I wanted to send you some “Hogs and Kisses” so without further ado Meet Porky and Petunia. They were inspired by clip art from and I couldn’t wait to make them because they’re so cute. As soon as I saw the clip art I knew they’d be among my favorite Valentine’s Day cookies!

I know these Hogs and Kisses are a little bit late for Valentine’s Day, but you can make them any old day of the week for the ones you love. They’ll taste just as good in March, September, or November as they do on Valentine’s Day so grab a baking sheet and let’s get started.
Hog and Kisses Cookies Video:
Enjoy the video!
Supplies for Hogs and Kisses Cookies Supply List:
(may contain affiliate links)
Sugar cookie recipe, chocolate roll-out cookie recipe, or gingerbread cookie recipe
Royal icing recipe or Half a Batch of Royal icing
Light Pink Icing –15 Second Icing
Medium Pink Icing
Bunny Rabbit Cookie Cutter
Black Food Gel Color or a black food safe marker
Food safe Marker to draw the pigs ears onto the cookies (A light color will work best)
Paintbrush
Royal Icing Apple Blossom Flower for Petunia’s hair- or pick your favorite flower from this list of tutorials.

- I wasn’t sure what cookie cutter I needed to use to make these hog cookies, but when I started looking I found exactly what I was looking for. While I was looking at this rabbit cutter, all I could see was a skinny pig because of the way its arms are shaped. If you don’t have this cutter and would like to purchase it, you can find it here at Country Kitchen Sweetart.

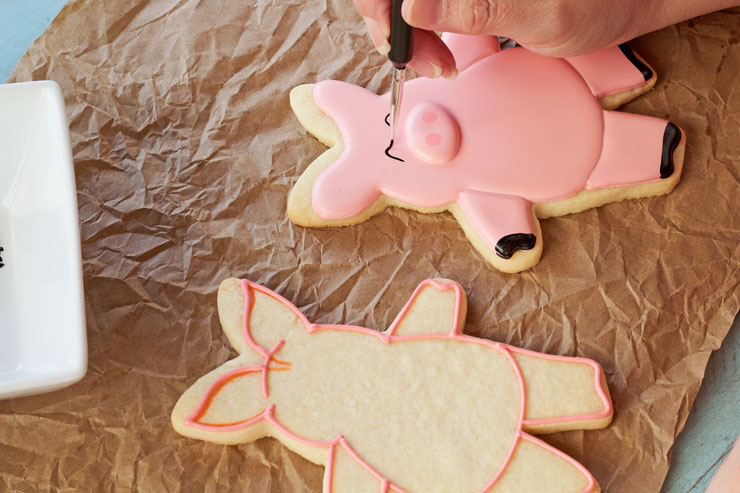
- Before you start piping the outline for the pigs, draw the ears on the cookie with a food-safe marker so they’ll all look about the same. Sometimes piping them makes it difficult for them to look the same, but be sure to use a light color so the marker won’t bleed into the icing.

- Are you ready to decorate because it’s time to outline the pigs and then flood the body.
- Let it dry for about 10 minutes before you flood the arms and legs because this will give the limbs separation.
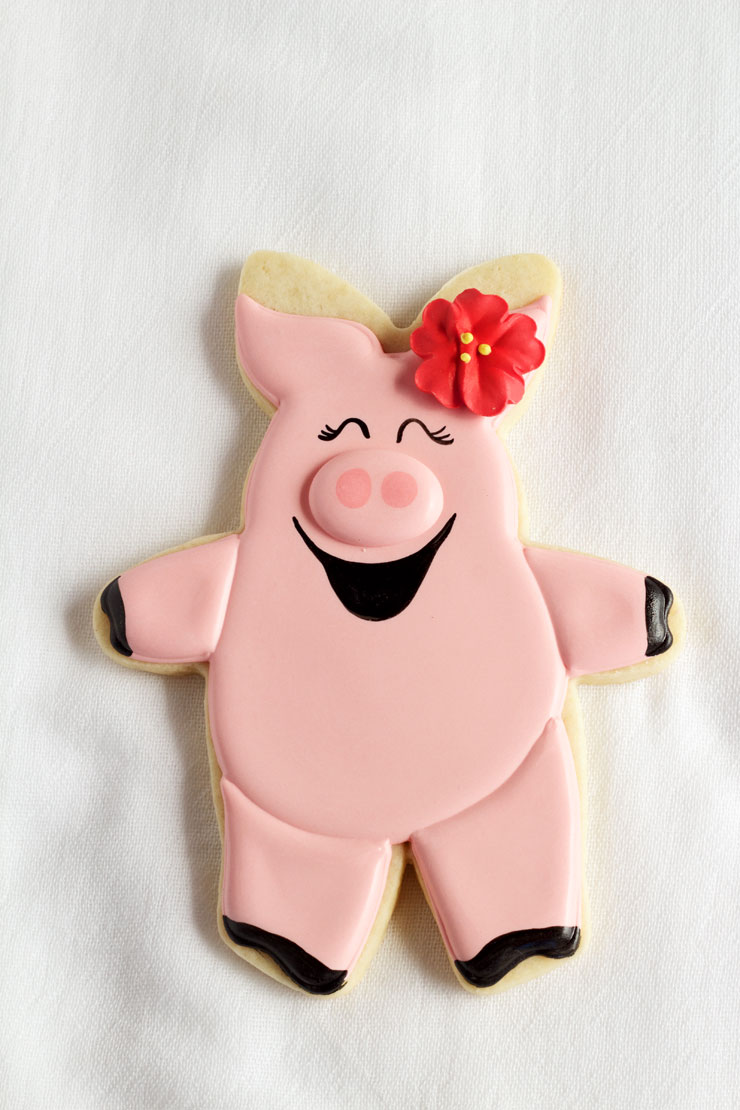
- Next, pipe a pink oval for the nose and add two small oval dots with a darker color of pink icing. Or wait until the icing dries and add two small ovals with a pink food safe marker.
- Let the cookie dry for a few hours before you add the final touches.

- This next part is fun because we get to paint the hands and feet with black food gel.

- Mix a small amount of gel color with a little vodka and paint the tips of the feet and hands.
- Use a smaller detail brush to paint the eyes, but don’t forget to add a few eyelashes for the girl.

- Next, paint the mouth and glue Petunia’s flower on her head because all the girl pigs need a flower.

- I think these would be a good set of cookies to take to a BBQ because everyone is expecting pork.
- Petunia looks like she is already ready for a BBQ or maybe even a Luau Party! Just imagine her in a grass skirt and bikini top! LOL
I don’t know about you, but I’d love to receive these on Valentine’s Day. Getting any cookie for that was made with love is a great gift. I wish I could bake one for all of you because I sure love y’all! Happy Valentine’s Day!
Bear hugs,


Soooo cute! Thank you for this tutorial!
I just love those little guys, thank you for sending me hogs and kisses!
Genius use of a bunny cutter! I didn’t see it until you shared it 🙂
Just came across your site today for the first time as a link from another site having to do with strawberry cookies. I thought it would be fun to take a batch of strawberry cookies and strawberry cupcakes to the farm and it’s owners, the husband whom I’ve known all of my life and where I have gone strawberry picking for at least 30 years. I live in one of those small towns/rural farm & orchard areas where families know each other for generations (we are two of those). How I ended up looking at a pig cookies I can’t quite explain but it captured my attention. I love the re-use of cutters in the manner like you did the pig. I do have one question concerning this though. Once you decided on your shape of the piggy’s ears, why didn’t you cut off the excess? By the way, I LOVE the idea of drawing the guidelines. The invention of these edible markers have been a pure blessing to the edible decorating world. I know I’m lousy at writing on cakes with frosting and haven’t quite got into using tappits yet and on fondant I will often use the markers. In the 6 or 7 years I’ve actually been decorating seriously I can’t believe the MASSIVE number of accessories that are CONSTANTLY appearing the help the “hobby” baker such as me create masterpieces. Most family members in farming that I have are more into cows. Now I need to come up with a pork farmer who might like some piggy cookies one day for a special occasion. These are SO cute.
Hi Pam!
It sounds like you have a fun life in a small farm town. I can only imagine the inspiration you could get from just walking around your area.
To answer your question about why I didnt’ cut off the bunny ears when I made the pigs is a good question. I could have cut the ears off but it workd out leaving them on. Some decorators will make the pigs ears bigger so they can use the extra space. You can leave them on or cut them off. It is a personal preferance. 😉
Have fun with the strawberry cupcakes and cookies!
Lisa