How to Make Fun Slice and Bake Bear Cookies
The other day I was looking at some slice and bake cookies online and came across some at the Disney Family website. They had the cutest red and green Mickey & Minnie Peppermint Swirl Cookies I had ever seen. As I read the instructions I thought it would be a good project for me and my grandson to make and then it hit me. Slice and bake bear cookies the Bearfoot Baker way!  I mean the mouse is cute and all but come on, bears are cuter! Well at least they are in my house.
Slice and Bake Bear Cookies:
Sugar Cookie Recipe
Brown Food Gel Color
Small round cookie cutter
Sharp Knife or pizza cutter
Royal Icing Flowers for the girl bears
A piece of paper that is cut 9″ x 9″
The best part about this project is you don’t have to have any special tools to make these slice and bake bear cookies and you don’t have to make icing. A good sugar cookie recipe and a little brown food gel color is about all you need. If you want to mix things up a little, you can use other types of cookie dough such as a chocolate rollout cookie recipe mixed with a sugar cookie recipe mixture or a gingerbread cookie recipe and a the sugar cookie recipe.
You can also add different flavors to the slice and bake bear cookie dough. You can follow Disney and use peppermint or you can make almond, root beer or strawberry. Be brave and mix it up and see what the kiddos like best. I’m a bit boring sometimes and use pure vanilla extract in my sugar cookies.
How to Make Fun Slice and Bake Bear Cookies
Ingredients
- Sugar Cookie Recipe
- Brown Food Gel Color
- Small round cookie cutter
- Sharp Knife or pizza cutter
- Royal Icing Flowers for the girl bears
- A piece of paper that is cut 9" x 9"
Instructions
- Make a batch of sugar cookie dough.
- Divide it in half.
- Add some brown food color gel to one of the halves.
- Place it back in your mixer and mix just until the color is even throughout the dough.
- Roll out the dough to about 1/2" thick, cover it with plastic wrap and place it in the fridge or freezer for a few minutes so it will be easier to work with.
- While the dough is chilling you can make a 9"x9" paper template to make things work a little easier.
- Place the 9"x9" template on top of the brown dough and cut it into a square. Repeat for the uncolored sugar cookie dough.
- Place the square sugar cookie dough on top of the square brown dough.
- Next cut 3" off one side of the paper template. You should now have one 6"x9" piece and one 9"x3" piece.
- Place the 6'x9" template on top of the square dough and cut off the 3" with a sharp knife or a pizza cutter.
- Roll each 9" piece into a log. It will help if you use the plastic wrap to help get you started.
- Note: Once you trim the brown and the uncolored dough you can re-roll it and cut it into a 3"x9" log and to make some small bears. If you use my sugar cookie recipe you can get 20 large bears and 12 small bears.
- If you want to wait a few days to make them, wrap the logs well and place them in the freezer until you are ready to bake them.
- If you're going to make them right now, wrap the logs with the plastic wrap and place them in the freezer for about 30 minutes so they'll be nice and firm when you slice them.
- Slice the large log into 3/8" slices.
- Use the cookie cutter to cut a notch on each side of the bears head and save the little piece to use for the bears nose. We'll make those in a minute.
- Slice the small log into 3/8" slices and then cut them in half.
- You may need to pinch each half of the little slice (ears) to make them fit into the notches you made with the cookie cutter. Place the ears in the notch and press them in place.
- Roll the dough from the 'notch' you cut into a ball and place it on the bears face for the nose.
- If you want the bears to be dark brown along the outside edge, just trim off the uncolored dough and press the brown together.
- Bake according to your sugar cookie directions.
- Once the bears cool you can add a few royal icing flowers to make a few of them look like girl bears.
 Let’s get started.
- Make a batch of sugar cookie dough.
- Divide it in half.
- Add some brown food color gel to one of the halves.
- Place it back in your mixer and mix just until the color is even throughout the dough.
- Roll out the dough to about 1/2″ thick, cover it with plastic wrap and place it in the fridge or freezer for a few minutes so it will be easier to work with.
 While the dough is chilling you can make a 9″x9″ paper template to make things work a little easier.
- Place the 9″x9″ template on top of the brown dough and cut it into a square. Repeat for the uncolored sugar cookie dough.
- Place the square sugar cookie dough on top of the square brown dough.
Next cut 3″ off one side of the paper template. You should now have one 6″x9″ piece and one 9″x3″ piece.
- Place the 6’x9″ template on top of the square dough and cut off the 3″ with a sharp knife or a pizza cutter.
- Roll each 9″ piece into a log. It will help if you use the plastic wrap to help get you started.
Note: Once you trim the brown and the uncolored dough re-roll it and cut it into a 3″x9″ log and to make some small bears. If you use my sugar cookie recipe you can get 20 large bears and 12 small bears.
 If you want to wait a few days to make them, wrap the logs well and place them in the freezer until you are ready to bake them.
- If you’re going to make them right now, wrap the logs with the plastic wrap and place them in the freezer for about 30 minutes so they’ll be nice and firm when you slice them.
- Slice the large log into 3/8″ slices.
- Use the cookie cutter to cut a notch on each side of the bears head and save the little piece to use for the bears nose. We’ll make those in a minute.
- Slice the small log into 3/8″ slices and then cut them in half.
- You may need to pinch each half of the little slice (ears) to make them fit into the notches you made with the cookie cutter. Place the ears in the notch and press them in place.
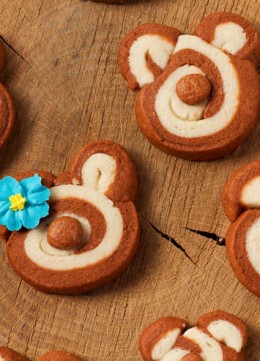
- Roll the dough from the ‘notch’ you cut into a ball and place it on the bears face for the nose.
 You may need to adjust the size of the nose. I made them all about the same size but I think it would look good if some were bigger and some smaller.
Also, if you look at the picture above you will see I am placing a nose on a bears face that seems to have a hole in it. Don’t stress! They are only slice and bake bear cookies so they don’t have to be perfect. As a matter of fact, the little space will make them look like they are smiling at you.
If you want the bears to be dark brown along the outside edge, just trim off the uncolored dough and press the brown together. I don’t think it makes that much difference but I do seem to like the brown edge around the face. You can even place the uncolored dough at the top of the head so it will look like your bears have cute hair styles.
Bake according to your sugar cookie directions.
 Once the bears cool you can add a few royal icing flowers to make a few of them look like girl bears.
I can’t wait to make these for Christmas. I think they will get me a few ‘bear hugs’ when I give them away!
More Bear Cookies:
Polar Bear Cookies with a Baby Cutter
How to Make These Simple Polar Bear Cookies
Bear Cupcakes
Bear hugs,

These are darling! So fun to make with your grandson! I have grand dogs 😉
I bet you can make a dog friendly version! 😉
So darn cute Lisa!
They are so darn easy Jennifer! 😉
These are adorable! I love them!
Thanks Sarah! I have been on your site drooling over your pink lemonade crinkle cookies!
Here is the link if anyone wants to see something delish!
http://sarahsbakestudio.com/2015/07/pink-lemonade-crinkle-cookies/
Thanks Lisa! You’re too kind! 🙂
The bear cookies are cute. I like your site but the ads are annoying so I don’t visit often. The subscribe banner at the side interferes with reading. I’m already subscribed so would like to be able to turn it off.
I have talked to my maintenance person and we are looking into it. Thanks for letting me know about your issue.
Bear hugs,
Lisa
These are the cutest! Your too sweet bear cookies made me smile..as I’m sure all the lucky recipients will be doing come Christmas-time!
You are sweet Karen! I hope they make people happy. If not I guess I will grab them and give them a big bear hug! LOL
Lisa these are soooo cute! Thanks so much for sharing!
Thank you Judy! 😉
Hi Lisa,
I love your ideas but would it be possible to have a print button just for the step so the replies and the advertisement does not print out. I am having a problem isolating the instructions to print them.
Thank you
I added the printable instructions for you. I don’t know why I didn’t do it in the first place. LOL Let me know if you need anything else. 😉
Hi Lisa,
Thank you for adding it.
These are as cute as can be! I love their little noses!
wow! They are so cute!! Thanks for sharing this recipe, they are awesome!