Popsicle Royal Icing Transfers & Templates
This post may contain affiliate links.
Who doesn’t love a good Popsicle in the summer? I know I sure do. I like them so much I decided to make Popsicle royal icing transfers & templates for you today. And with this new “add a face to everything” phase, you end up with some pretty darn cute Popsicle Royal Icing Transfers.") I wanted to let you know that you need to make extras. The popsicle stick will break so if you need 2 dozen, I would suggest you make 3 dozen. I always try to make my templates to be a bit more durable but, these were so cute that I had to make them even if I knew a few would break.
I wanted to let you know that you need to make extras. The popsicle stick will break so if you need 2 dozen, I would suggest you make 3 dozen. I always try to make my templates to be a bit more durable but, these were so cute that I had to make them even if I knew a few would break.
Supplies for Popsicle Royal Icing Transfers:
15 Second Icing in these colors:
Light Yellow
Light Blue
Light Green
Pink
White
4mm sugar pearls
Tan
Small Popsicle Template
Medium Popsicle Template
Large Popsicle Template
 Begin by making the popsicle sticks with the tan icing. Let it dry for at least 30 minutes.
 Then, add the top of the popsicle royal icing transfers with the colors of your choice. You can fill them in totally or make it look like they have had a bite taken out of them. I like it both ways so I did a few of each. Be sure to add the popsicle icing onto the stick so it won’t break off as easy.
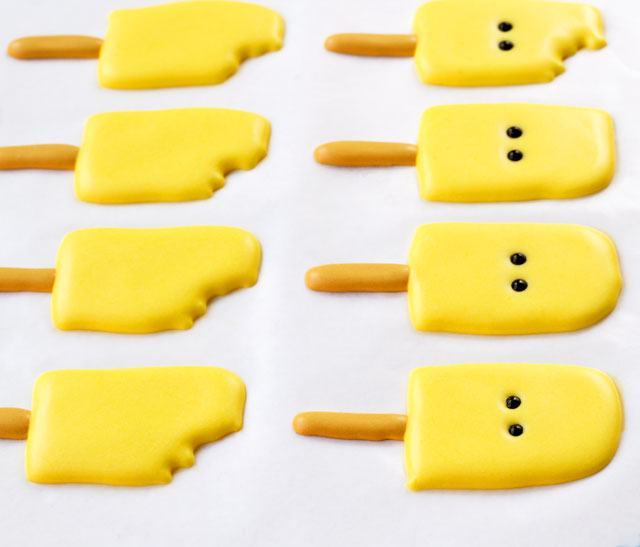 While the top of the popsicle is wet, add the 4 mm sugar pearls for the eyes and let them dry for another 30 minutes.
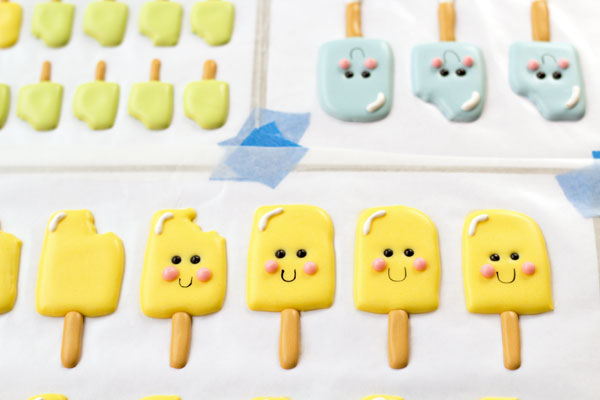 Next, add the pink cheeks, a white highlight and paint on a happy little smile with black food gel. If you want to see a video tutorial on how to paint on a cookie, click here.
") See the blue RI Transfers in this picture? Do you see the white icing below the tan stick? That is my tip of the week for you. If you want your transfers to stick straight up in a cupcake or cake, pipe a white tale on the end of the design. White won’t bleed with your cupcake icing colors and it will allow you to see your entire transfer design without it being stuck in the cupcake.
See the blue RI Transfers in this picture? Do you see the white icing below the tan stick? That is my tip of the week for you. If you want your transfers to stick straight up in a cupcake or cake, pipe a white tale on the end of the design. White won’t bleed with your cupcake icing colors and it will allow you to see your entire transfer design without it being stuck in the cupcake.
I hope you are enjoying “Template Tuesday” as much as I am. I am working on some of your design requests and will be sharing them soon. I also linked these up at Whipperberry. I love her link parties. You can find so many cool things there.
For information on how to store royal icing transfers, click here.
Bear hugs,

I LOVE these!!! They are adorable!
Thanks Jana!
I am actually giddy over these adorable popsicle transfers! Each new transfer becomes my favorite, so it seems, but these really ARE my favorites!
P.S. Thanks for the templates!
Thanks so much Sue! You are so sweet. You are very welcome for the templates.
So…crazy…cute!! The faces on these guys make them even cuter than they already are. Great addition to TT!
Thanks Michelle. I am enjoying the “add a face to everything” trend.
Wow, cuteness overload! These are incredible, Lisa! Love the tip on the white icing too!
Thanks Mike!
Adorable!
Thanks Asmita:)
Look at you go – with all those micro mini popsicles – too cute!
Thanks Kim! I am becoming a royal icing transfer and template machine! LOL
Oh my gosh – those faces, I die! These are too adorable for words, Lisa!!
Hahahah! You are so stinking cute Jennifer! I want to hug you!
I don’t even know what to say. You’ve outdone yourself with these Lisa. ADORABLE!
Awe! Thanks Nikki!
I am so inspired!!!
Well, you inspire me EVERYDAY!!! lol
Really cute!! I like a lot these RY transfers 🙂 So nice and summer.
Thank you!! 😉
They ARE so cute. I’m loving Template Tuesdays!! Thanks!
You always have the most darn cute things! Love the popsicle faces 🙂
You do come up with the cutest royal icing transfers! Love these Lisa 🙂
These are absolutely the happiest, cutest little things ever!!!! I have to make some today!
These are so adorable and with the little faces, they’re too cute for words! Your tip about adding extra royal icing to the tip of the Popsicle stick is brilliant.
And once again, I am smiling! Love these!
These are adorable for one, for two I wanted to thank you for the white icing line at the bottom of your decoration tip!! We work so hard/long on those cute transfers and they just don’t seem to look as nice all squished down in icing.
They’re so cute!!!! Thank you for sharing us the templates 🙂 Do you print them with your printer or do you go somewhere? If so, do you print them on regular paper?
Hi Sofia,
I print them on my home printer and then tape the template to the back of a baking sheet. I use painters tape to hold them in place. Then, cover the temmplates with wax paper and tape it into place. Once you do that, you are ready to pipe your designs.
Just remember, let them dry completely before you remove them. It may take a couple of days. 😉
Thank you Lisa!!! (:
I love sweets
Me too!! LOL