Sewing Cookies for Mother’s Day
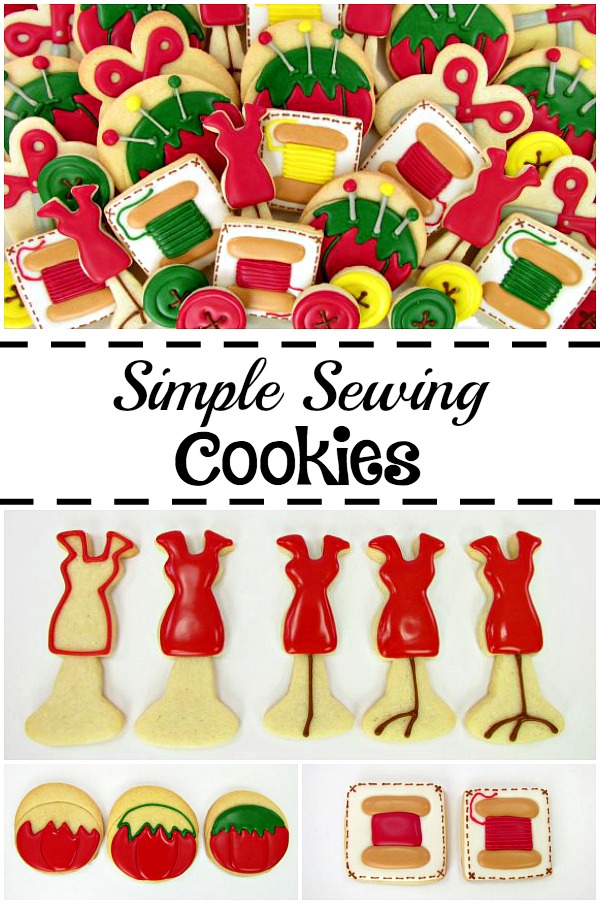
Happy Mother’s Day Week everyone! I wanted to make some sewing cookies for Mother’s Day this year. I first made these cookies back in 2010 and I wanted to make a tutorial for you so you can make some sewing cookies for your mom. I think these are a great way to say Happy Mother’s Day. You can even make a cute card that says we love you “Sew” much but, I didn’t think of that until just now or I would have made one for my mom. Anyway, lets make some cookies.
 I am not sure if it is the colors or the design but, for some reason these have always been one of my favorite sets. I do like to sew and make quilts and maybe that is the reason. I will say, if someone every gave me sewing cookies, I would hug their neck and make them a quilt!
Sewing Cookies Supplies:
I used 15 second icing for this set.
Colors:
Grey
Yellow
Green
Red
Brown
Tan
White
Tomato Pincushion Cookie
 I avoid hand cutting whenever I can so to make these, I used a smashed circle and a flip flop cutter. I placed the smashed circle into the flip flop and cut.
 Then, you can cut a piece of paper like the top of a tomato and use it as a template and trace with a food safe marker.
 Next, with the red icing, outline your tomato. Immediately flood both sides and let dry for about 20 minutes.
 With the red icing, flood the middle and let it dry for about 20 minutes.
Then, outline the top of the tomato with green and flood right away.
 With your grey icing, make three little lines where your want your pins to be and let it dry for about 20 minutes. This step is important because when you make the pins you don’t want them to look like they are falling down the top of the tomato later. Adding the lines will make it level. Now let this dry several hours or overnight before you add the final details.
Then, with the grey icing, add the pins.
Next, make the balls on top any color you want.
With your green icing, make the lines on the tomato and where the pins are pushed into the tomato top.
The Dressmaker Dummy

For the dressmakers dummy I used a dress cutter and a martini glass cutter. You can use almost any dress cutter for this. The wedding dress was perfect for what I wanted but the other one work well after I trimmed a little off the sides.
 Next outline the top of the dummy with red icing and flood immediately.
Then, add the stand with your brown icing.
Spool of Thread Cookies
 First, cut a pattern for thread from paper and traced it onto your square with a food safe marker.
 Then, outline the cookie with white icing and flood the background. Let it dry several hours or overnight.
 With your tan icing, flood the top and bottom of the spool.
 With your brown icing and a small tip, (I used a 1.5 PME) make an “X” in each corner of your cookie. Then make your stitches around the edges and let it dry for several hours or overnight.
 Next, with your red icing flood the center of the spool and let it dry for about an hour. Then, add the lines for the thread.
 If you want a tutorial for buttons, Sweet Sugar Belle has a great one here. That is where I learned to make them.
I love being a mom! It has been the greatest pleasure of my life and I have loved every minute of it! Yes, even moments like when we were on our way to church Easter Sunday morning and Tylor, who was about six at the time, grabbed his little sisters Easter basket and tossed his cookies into it. And like the time when all three kids had chicken pox at the same time. Or the time when they had a pet hamster that I swear was Harry Houdini reincarnated because it would escape from it’s cage and crawl on my face while I was sleeping!! Yes, all these things really happened and although it wasn’t funny at the time, we laugh about it all the time now.
Happy Mother’s Day! Now go make some sewing cookies for your mom and grandma!
Happy Creating,


Your creativity never ceases to amaze. The spools of thread are my favorite
Thanks Laura! You are so sweet!
This are just insanely perfect, Lisa!!!! LOVE everything about them and you are a master of the cutter repurposing! Hope you have a good week!
Thanks Vicki! I hope you have an amazing week also! Thanks for stopping by!
The spools are SO CUTE!!! I love the dimensions you added!
Thanks Georganne! I am on my way to your blog now;) Have a great week!
Thanks for the detailed instructions in your tutorial, I am definitely going to give these a try!
Oh great Diane! When you do I would love to see pictures:)
So lovely! I love the stitch border around the spools – it is the perfect touch!
Thanks Jennifer! I hope you have a wonderful week!
These are so stinkin’ cute…wish I had someone to make these for!! Love how you “repurposed” all the cutters!
They are all adorable…great job and fantastic tutorial! Love the pincushion 🙂
Awe…the pincushions are my favorite also. It reminds me of my grandmother sewing;) She was always working on something or in the kitchen. She was a wonderful teacher!
Awww…..I love all your sewing cookies, Lisa……and your funny stories……and you. 🙂 I hope you have a wonderful week celebrating the absolute privilege of being a Momma. 🙂
I hope you have a wonderful Mother’s Day week Pam! Hug the kids for me:)
so awesome!
Thanks Nicole! I am glad you stopped by!
These are gorgeous Lisa!!
You are “sew” sweet Samantha!! 🙂
These are wonderful! I especially love the dress forms!
I was just thinking I need (want) to make some sewing cookies for Graces’ sewing teacher! These are so great!! Thanks for the step by steps!
Can’t wait to see yours Glory!! They will be amazing and I want to see pictures;)
These are “sew” cute! How talented and creative you are! Thanks for the tutorial. Love the stitches around the spools:)
I think I love you Bearfoot Baker! Lisa, you write in such an accessible, friendly way. And your tutorials are great! These cookies are fantastic…thank you!
I loved this set so much when you first posted them on Flickr! My children had chicken pox at the same time! I agree, I love being a Mom and having the Mom I have! xo
Awesome! Love your creative use of all the different cutters! I did some sewing cookies for my Mom not too long ago so for Mother’s Day I’m doing cookies for my mother-in-law. I’m hoping to do cookies with a leopard pattern. Right now I’m a little worried because the humidity here in TX (I just moved here) is causing some issues with my recipes!
You are so creative!!
there needs to be a cookie brainiac award….that dressmaker cookie, from the margarita cutter!!!! You are brilliant my friend!!!!
Lisa these are Awesome and thank you so much for your tutorials and your friendly inviting personality!
You make learning seem so easy!
Awe…Thanks Diane! I am so happy you are here.
Awesome! My mother would love these! Juste a question about the tomato pincushion. Do you pipe above/over the layer that you previously let dry to create de needles?
I pipe on top of the layer. I hope that makes sense.
hello?? dress dummy maker BRILLIANCE!!!!
I am sew in love with these cookies! I love the bold colors!! And the pin cushion is great!!!
love your creative use of per-existing cutters. Thanks for the great tutorial!
Hi Lisa,
Thanks for the tutorial. I made a pincushion and spool cookie as part of my Mom’s Mother’s Day cookies. Here is a picture if you’d like to take a look:
http://www.flickr.com/photos/dianeop/7176158862/in/photostream
These are great!! I belong to a small quilt group and these are perfect!
These are SUPER cute! Thanks for showing us how you created them! I especially love the pin cushion!~Sarah