Simple Butterfly Cookies – Part 1
Have you ever watched a butterfly flutter and fly around your yard? It is amusing because they don’t fly from point A to point B in a straight line like birds do. They flutter and fly in a zig-zag, crazy random pattern. If you try to catch one you will look like a crazy person running around in a zig-zag pattern swatting a butterfly net from left to right like you are being attacked by killer bees. How do I know this? My grandson loves to chase them so we do it often and I look like a crazy woman because I’m throwing my arm all around and running in circles. Sometimes we catch them and sometimes we don’t. The great thing about being a grandma is you can bake butterfly cookies and get a big hug. It was easier than running through a field trying to catch one.

I know they may look hard to make but if you take it one step at a time they are simple. I thought it would be fun to make this an educational experience so I added a few cookies to make the life cycle of a butterfly. What do you think? I think cookies are fun and can be used as an informational snack or for a science project or as a tool to keep you from running around like a crazy person.
We will start with the butterfly cookies today and make the caterpillars, leaves, pupa and the flying butterflies tomorrow and Friday.
Supplies for Simple Butterfly Cookies:
15 Second Icing in the following colors:
White
Black
Yellow
Piping bags or decorating bottles fitted with #2 tips-I am a huge fan of PME tips but any tip will work.
Airbrush gun with yellow and orange airbrush color
Paintbrushes- I like this set and this set
Black Food Gel Color

Outline and flood the wings with the white icing. I am going to add a tutorial on how to make the flying butterfly on Friday so be sure to check back then. You can add one or two to a platter or set to make your platter or set stand out.

To make the base for the butterfly cookie, begin by airbrushing a little yellow on the wings.
Then, outline the edges with orange.
Next, airbrush the entire wing with orange, but don’t add a heavy spray on the yellow areas. I know it is hard to see in the picture, but a thinner coat of orange on top of the yellow will give the illusion of see-through wings. You can see it better in the picture below.

Painting on a cookie is simple if you have the right brushes. All painters have their favorite brand or type. I added a link to my favorite detail brushes in the supply list and they may or may not work for you. I suggest you go to your local craft store and purchase one or two inexpensive ones to see if you like them. If you do, great! If not, you can buy a few more until you find the type you like.
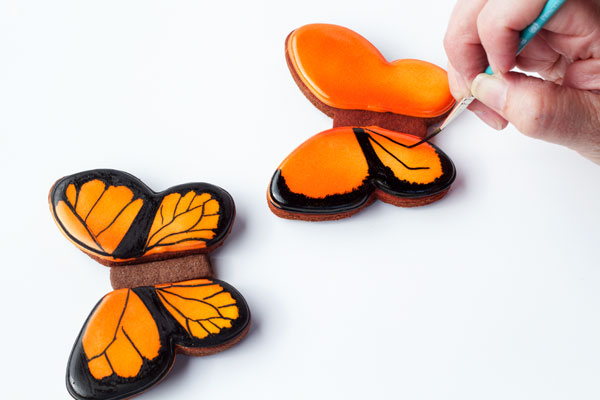
To begin painting on the wings, add a little water to a little black food gel and load your detail brush. Make a black outline on the edge of the wings like on the picture above.

Paint in between the lines with the black food gel and the wider brush.

Continue all the way around the wing.

Be sure to go all the way to the edge of the cookie.
Once your cookies has a thick outline painted on the edge, use the tip of the brush to make the inside edge a little rough looking. You don’t want the inside line to be straight and smooth because that is not how a real butterfly wing looks. It will look more realistic if you make a rough line.
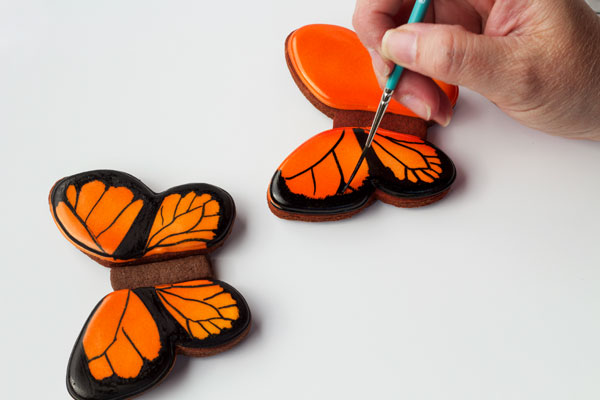
Next, make the lines on the inside of the wings. It is simple if you take one line at a time. Use the detail brush to make a square-ish teardrop shape on the bottom wing.

See how simple that was?

Add a few lines from the teardrop shape to the thick black line.

Continue around the bottom wing because we aren’t quite finished but, since we have the detail brush loaded and ready we can move onto the top wing.

Make an open oval at the top of the wing.
Then, make a few lines from the oval to the thick black line.
If you look at a picture of a butterfly, you’ll see the thin black lines don’t just attach to the thick black lines on the wings. The orange part is in an oval shape so it’s easy to achieve by painting a triangle where the thin detail line meets the thick black line on the wing. Add one to each detail line.

Finish the wing by painting a thick line at the top of the wing with the thicker brush.


Repeat the process on the other wing and allow it to dry for a little while.

Then, make a few white dots around the edge of the wings and allow space between each one.

Add yellow dots in between the white dots.

The body of the butterfly is easy to make so pipe a black dot for the head.

Use a Boo Boo Stick, toothpick or a turkey lacer to pop any bubbles and to make the icing smooth and let it dry for about 20 minutes.

Then, pipe the body with the black icing by adding dots or making a solid line and you can mix it up when you make a batch.

There you have it, simple butterfly cookies that everyone can make because they’re not hard once you know how to make them. Be sure to come back tomorrow and Friday because we’ll share the tutorials on the leaves, pupas, caterpillars and the flying butterfly cookies.
Part 2-How to Make a Caterpillar Cookie, click here.
For Part 3-How to Make a Flying Butterfly Cookie, click here.
Information on how to paint on a cookie, check out this video.
For more information on how to airbrush a cookie, check out this video and this one.
Bear hugs,


Hi Lisa,
These are truly exquisite! I love the step by step method you have shown. I have to make some butterflies for my niece and these will be perfect! Now that I have bought the air brush gun (thanks to all your inspiring videos)!
I always thought one had to use vodka mixed with color to paint. This is much easier to just mix water.
Thanks so much
Asmita
You are a natural Asmita! You don’t need my help! LOL
I used vodka when I first started painting on cookies then I saw Arty McGoo using water. I like the water much better.
Best….grandma….ever!
I don’t know about that Lizy B but I love that boy and will act like a crazy person any time for him! LOL
These are just beautiful! I would never have thought you painted most of it. Now, I just need an airbrush. 🙂 Thank you for the tutorial!
Incredible piece of art. You are just too good and thanks for the inspiration. This is so perfect.
Painting on a cookie would be so much easier for me than piping. I love your technique and the butterflies are so pretty.
Lisa,
LOVING these gorgeous butterflies! I love the painting technique and your style and talent shines!!!!! Thanks for sharing!
Cookie hugs,
Patti
Wow, Lisa the whole entire set is beautiful and the way yout taught…I want to be in your class every day!
Lisa, These are absolutely stunning! I have a daughter that loves butterflies, so I need to get busy! I LOVE the 3D butterfly!