How to Make Easy Witch Hat Sugar Cookies for Halloween
This post may contain affiliate links.
Happy Halloween! I hope you’ll join me and make some easy witch-hat sugar cookies. The great part about making these Halloween cookies is that the witch hat and spooky eye royal icing patterns make it easy. Stress-free sugar cookies are on the menu because you can make the royal icing transfer now and bake the cookies tomorrow or later in the week. If you let the kiddos help, it’ll be a win-win situation for everyone! Keep reading, and you’ll find the royal icing transfer patterns under the supply list.

As you look at the supply list below, don’t panic! The list looks large, but it doesn’t have to be. I included links to all the supplies I used because I get questions and wanted to provide all the info I can to help you locate all the goodies. Like I said, you don’t need all of this stuff to make these cookies. I just wanted to provide links to the handy things I use often just in case you’re interested. Have fun looking around.
Supply List for How to Make Easy Witch Hat Sugar Cookies:
(may contain affiliate links)
Recipes:
Cutters:
Royal Icing Colors:
- White- Americolor Bright White Soft Gel Paste Food Coloring
- Black- Americolor Super Black Soft Gel Paste Food Coloring
- Orange- Americolor Orange Soft Gel Paste Food Coloring
- Green- Americolor Electric Green Soft Gel Paste Food Coloring
- Purple- The Cookie Countess Positively Purple Gel Icing Color
- Yellow- The Cookie Countess Sunshine Yellow Gel Icing Color
Things to Airbrush:
Airbrush System:
Colors-Airbrush Colors:
- Positively Purple The Cookie Countess Edible Airbrush Color
- Forrest Green The Cookie Countess Edible Airbrush Color
- Outrageously Orange The Cookie Countess Edible Airbrush Color
- True Blue The Cookie Countess Edible Airbrush COlor
Airbrush Tools I love and Use Often:
Stencils and Stencil Tools
- Polka Dot Stencil
- Diagonal Thin Stipe 2 Stripes
- Night Sky Stencil
- Stencil Genie
- Magic Stencil Screen Airbrush Tool
Tools:
- Airbrush Cleaning Pot- I use this every single time I use my airbrush gun. You can get the jar at Wal-Mart, a grocery store, online, or even at The Dollar General store.
- Tipless Piping Bags
- PME #1.5
- PME #2
- Turkey Lacer, Thingamagenie, or BooBoo Stick
- Spray- Roxy & Rich Satin White
- Parchment Paper or Super Clear Cello Bags 4.25″ x 6.5″ (100 pcs) from Truly Mad Plastics
- Reusable Piping Bag Ties
- Piping Bag Tip Clips
FREE Royal Icing Transfers
(Make these in advance so they’ll be dry when you decorate your cookies. I make them 24 to 48 hours before I bake my cookies most of the time. Sometimes I make them a month ahead of time. That is the beauty of royal icing transfers.)
If you click the links below they’l take you to my new site The Cookie Network. You can sign up for FREE and download the free royal icing transfers. It doesn’t cost a thing. If you’re interested in any of my online or in-person classes you will also see them listed there. I love how everything is located in one place. Don’t be shy! Sign up and get your FREE Royal Icing Transfers!
Witch Hats
Circles for the Eyes
How to Make Easy Witch Hat Sugar Cookies for Halloween Video:
Enjoy the video! And if you are interested in the Airbrush Cleaning Pot or How to Use an Airbrush Cleaning Pot check them out. I love the cost of the pot and how much it helps me from decorating in place instead of running to the kitchen sink when I need to change airbrush colors. If you’d like to purchase a few lids here is my Amazon link to help you find them,
Witch Hat Royal Icing Transfers:

- Print the witch hat royal icing transfer pattern and tape it to a flat surface. I like using the foam board I get from The Dollar Tree. I cut it into four pieces a little larger than the sheet of paper (there will be a little leftover) and then I tape the pattern on it. You can see how I do this in this You Are My Sunshine Tutorial.
- Cover the pattern with parchment paper or the Super Clear Cello Bags from Truly Mad Plastics and tape it over the witch hats.
- Then, pipe the hats with black royal icing. Pipe a zig-zag line with the outline consistency of royal icing. Wait a few minutes and then piped a second zig-zag line right on top of the first one. I did it this way because I wanted the hats to look a little rugged and be thick enough to remove from the cello bag without breaking.
- Next, pipe the hat band with the color of your choice.
- Let them dry completely and carefully remove them from the parchment paper or cello bags.
Now they will be ready when you decorate your witch hat sugar cookies.
Let’s Make Some Eyes!

If you look under the supply list you’ll find the link to the royal icing eye template. I’ll post a tutorial on how to make them soon, but it’s pretty simple to do.
- Download the pattern.
- Pick a color of royal icing and pipe inside the circle.
- While the icing is wet pipe some white royal icing on the center of the eye.
- Use a turkey lacer to move around and mix the eye-colored icing with the white icing.
- Next, pipe a black dot in the center but leave some of the white mixture showing. You don’t want to cover all that hard work you just did swirling the colors together.
- Add a small white dot on one side of the black.
- Let the eyes dry completely. I place mine in front of a fan to help them dry quickly without the colors bleeding together.
- Once they are completely dry you can airbrush a little color along the base in the same color you chose for the eyes. Yellow should be yellow, orange should be orange, purple should be purple, and so on. This will add a little character to your eyes and make them look better than a sold color for Halloween eyes. We all know witch hat sugar cookies need eyes with a little character.
- If you don’t have an airbrush system you can use a paintbrush, food-gel color, and a little vodka or water to paint the base of the eyes. It isn’t hard and it will work. I’ll demonstrate both ways in my upcoming tutorial so stay tuned.
Let the icing and the airbrush or food-gel colors dry completely before you remove them from the parchment paper.
Time to Decorate the Cookies for the Witch Hat Sugar Cookies:

- Begin decorating by outlining and flooding the cookie with the color of royal icing of your choice.
- Let it dry.
Airbrushing is Always a Fun Way To Add a Little Fun to Your Cookies:

I told you above that I was going to list all the tools I used to make these cookies and here is a perfect example of some amazing tools.
- Do you have or have you ever used a Stencil Genie? Oh, how I love this tool. It holds the stencil in place so you don’t have to worry about the stencil flying away as you add the airbrush color. If you don’t have a Stencil Genie you can use magnets. I’ve used them for years and they work well.
- Another fun tool to achieve clean airbrushed patterns to your witch hat sugar cookies is by using something like a Magic Stencil Screen Airbrush Tool. Do you see the gray screen under the Stencil Genie and on top of the cookie? Well, that is the Magic Stancil Screen Airbrush Tool. Its job is to will hold the stencil in place so the airbrush color doesn’t blow under the stencil. If the color goes under the stencil the color will land on the cookie in spots that aren’t supposed to have airbrush color. That will cause the stencil design to look messy. I bought my Magic Stencil Screen Airbrush Tool at The Cookie Countess for $12.99 and I really like using it. Just thought I’d share that info with you.
To see how I use these tools you can watch the video. You can see how simple it is to stack the tools and airbrush the cookies.
Airbrush the Pattern on the Cookies:
- So the point of this image is to show you how to grab a stencil, secure it over the cookie with a Stencil Genie or magnets, and begin to airbrush. It’s that simple!

- After you airbrush the design on your cookies spray the edges with the exact same color you used to add the design. This will make a great frame for the witch hats.

- Check out those stars. I love how clean they look!

- Add a little royal icing to the back of the hat and stick it on the cookie. See how simple this is? I love simple cookies that look as if you’ve spent days decorating them.

- Add the hat to the airbrushed cookie.
Time to add the royal icing eyes.
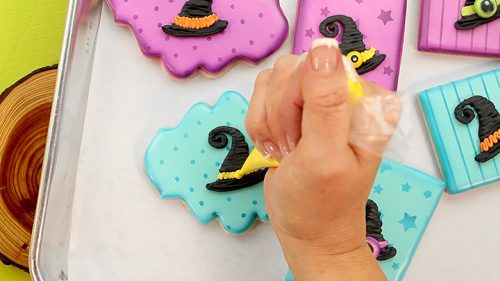
- Pipe a little dot of royal icing on the hatband.

- Place the eye on the wet icing.
- You’re done!
